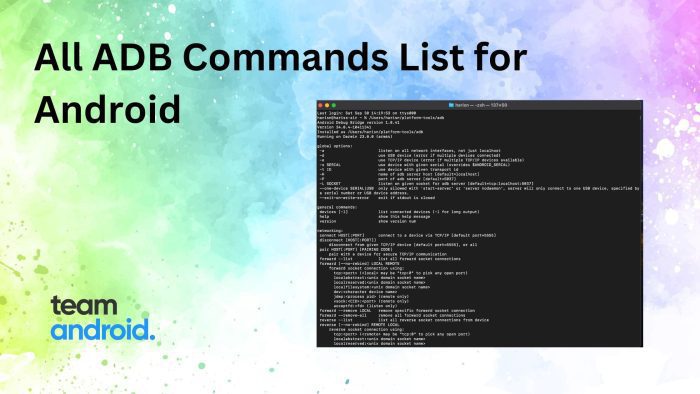
With the tips ahead, install complete Android 9.0 Pie emulator on your PC and test out all the new features. Google, just weeks back, rolled out the final public version of Android P. Along with the announcement of complete name and version number — Android 9.0 Pie — the brand also pushed final builds to all compatible devices. As this latest revision is quite new, it will still take some time to reach non-Google smartphones. However, if you want to test out the new features immediately, give our guide a read and implement Android 9.0 Pie directly on your computer system.
Compared to developer builds, this final Android 9.0 Pie releases comes with all initially promised features. Further, the reliability has been vastly improved. Targeted towards app developers who want to test out new API features and code enhancements, this Android 9 Pie emulator can also be used by enthusiasts just to generally browse around and see what has changed. The things we immediately noticed included the new notification drop-down, enhanced settings menu and improved UI.
Latest Post: How to Install Android 10 Emulator on Windows & Mac
The guide ahead uses Google’s Android Studio tool to implement the complete Android 9.0 Pie emulator virtual environment. Over the past couple of Android Studio releases, the emulator is something which has seen loads of improvement. Previously, the load times ranged between couple of minutes even on high-end hardware but now, you can boot up Android 9.0 Pie in just a matter of seconds despite running low specs.

It is essential you have a working installation of Android Studio. You should also update your Java install to the latest to avoid any issues. Also, if you haven’t yet installed Android Studio or set it up, please read the following tutorial.
Run Android Apps On Mac or Windows:
The Emulator is for developers who want to test out their apps on the latest APIs without a physical device. However, if you just want to play Android games or run full Android apps on your computer, we have complete guides for that. The process is much simpler than installing the full Android emulator and also, quite less on space required. If you have a Mac, you can use Andy or if you have a Windows machine, you can use Blue Stacks or install Nox Player.
Read more: Best Android Emulators for Windows and Mac
How to Install Android 9.0 Pie Emulator
The following instructions will help you install Android 9.0 Pie emulator using the latest Android Studio with support for future Android releases as well.
As mentioned earlier, this post implies that you have already installed and set up Android Studio on your computer. If you haven’t please read the following guide:
Step 1 – Open your Android Studio installation. You can execute the emulator by creating a new Android Development project and entering the Development Environment itself. Otherwise, open any project you are currently working on. From the main view go to Tools > Android > AVD Manager or in some cases, Tools > AVD Manager.

Step 2 – The next step is creating a new Virtual Device for Android 9.0 Pie specifically. In AVD manager, you will be able to see all your Virtual installations. Just click the “Create Virtual Device” button below.

Step 3 – Next, you will need to decide what device you want to emulate. As we want the latest Android 9.0 Pie running on our PC, we will choose Pixel 2. You can also choose any other supported device — Pixel, Pixel XL, Pixel 2 and Pixel 2 XL. Once selected, click Next.

Step 4 – The following screen will be showed once you click next from above step. This is where you decide what version of Android you want to run on your selected device. Choose “API 28” and make sure the API Level category shows that it is 28 then click on Download right against the name.

Step 5 – Now your Android Studio will ask you to agree to its license policy and then begin downloading as well as extracting the selected image. Select “Accept” and then click “Next“. Wait till the download and extraction process finishes before proceeding to the next step.


Step 6 – Once the extraction and download process finishes, click on “Finish“.

Next, let’s set up the Android emulator to actually run Android 9.0 Pie on your computer.
Next – How to Set Up Android 9.0 Emulator
Once everything is installed, now lets set up the Android Emulator so that you can play with Android 9.0 Pie on your computer.
Step 7 – Coming from the previous step, Android Studio will land you onto the following screen. Select the downloaded “API 28“ image, again make sure it has API Level listed as 28, and click next.

Step 8 – The next screen is quite simple. Contrary to previous iterations where you had to choose and test multiple settings, the new Android Emulator does that all for you automatically. You can set a few preferences otherwise everything else is largely optimized. Just name your AVD and click finish as we did.

Step 9 – Once finished, you will see your newly made Android Virtual Device pop up on Android Virtual Device Manager. Hit the green play button in the column of your newly created AVD.

Step 10 – The emulator will start within few seconds and you will see the following layout screen with the Android boot-up animation.

Step 11 – Once your device is on, you would probably greeted by this screen which indicates you have successfully completed the Emulator install.
Happy exploring!
If you get stuck anywhere or have any question related to the post, please do ask. We are here to reply and help you out!

Please help ! I am a doctor . I need a USB with android 8.0 to fire on any pc with windows 10. I want to install on android programs, not games! Please help or give me a link?
Andrew
help i cant play android pie in my pc
Emulator: emulator: ERROR: x86 emulation currently requires hardware acceleration!
I am the same
Liar On Nox And Bluestacks! It’s Not Dessert Pie 9, But Android 5 And Nugget 7! F-Zero Retired Music. Game Over. What? Is Android Studio Not Creamy Banana Pie 9?
Liar On Nox And Bluestacks! It’s Not Dessert Pie 9, But Android 5 And Nugget 7! F-Zero Retired Music. Game Over. What? Is Android Studio Not Creamy Banana Pie 9?
hi
I need the emulator can run apk files 64bit which support Android 9
thanks