Samsung Galaxy Ace 2 has never received a proper root method that you can use on your phone. However, but still you can root Galaxy Ace 2 I8160 on Android 2.3.6 official firmware. There are some build number requirements that we will get to in a bit and you will be able to get root access on your phone. Once you are rooted, you will be able to install custom ROMs and other system tweaks to your phone. You can easily root Android 2.3.6 on Galaxy Ace 2 I8160 with the following tutorial.
As you read further, we will guide you through the entire process of how to root Galaxy Ace 2 I8160 on Android 2.3.6 official firmware using ODIN and recovery. Make sure you backup all your data from the tips and tools given below and also read the important tips that you have to keep in mind before proceeding as you never know when something might get wrong. Let’s continue with the tutorial below.

Disclaimer: All the custom ROMs and firmwares, official software updates, tools, mods or anything mentioned in the tutorial belong to their respective owners/developers. We (TeamAndroid.com) or the developers are not to be held responsible if you damage or brick your device. We don’t have you on gun point to try out this tutorial 😉
Root Galaxy Ace 2 Method Details:
Please remember, this method will increase your binary counter of the phone and you will not be able to reset till someone releases a method on how to reset the counter.
It is recommended that your Galaxy Ace 2 is on the XXLD8 Android 2.3.6 official firmware, but this method has been tested on other builds as well. You can backup and try on your own firmware.
Samsung Galaxy Ace 2 USB Drivers
You will need to connect your Android phone with the computer. For that, please make sure you have installed the USB drivers for Samsung Galaxy Ace 2 properly. If not, you can download the latest official drivers from our Android USB Drivers section here:
Download Samsung Galaxy Ace 2 USB drivers!
Backup and Other Important Tips
Done with the USB drivers? Perfect. The tutorial is on the next page, but first, please take a look at the following tips and important points you need to take care of. These are important, as we don’t want anyone losing their personal data or apps:
A few more optional tips that you should remember:
1. Having problems connecting your Android phone to the computer? You need to enable USB debugging mode. See here: How to Enable USB Debugging — for Gingerbread, Ice Cream Sandwich and Jelly Bean.
2. Make sure your Android device is charged up to 80-85% battery level. This might help you: How to Check Battery Percentage. Why? Because, if your phone goes off suddenly while installing a custom ROM, flashing an official firmware update or installing mods etc. — your phone might get bricked or go dead permanently. No one wants that, right?
4. Most of the tutorials and how-to guides on Team Android are for factory unlocked Android phones and tablets. We recommend NOT to try our guides if your phone is locked to a carrier, unless we have specified the carrier name or device model.
All set and ready? Good. Now, let’s proceed with the tutorial below and update Galaxy Ace 2 I8160 to Android 2.3.6 firmware.
How to Root Android 2.3.6 on Galaxy Ace 2 GT-I8160
We have put together a detailed step-by-step instructions guide on how to root Samsung Galaxy Ace 2 GT-I8160 on Android 2.3.6 Gingerbread. If you are used to installing official updates through ODIN on Samsung Galaxy devices, then this should not be any different for you.
Please read every line carefully and make sure you read the entire tutorial once before actually performing it on your phone.

To Remember:
- This tutorial is only for Samsung Galaxy Ace 2 GT-I8160. Please don’t try this on any other variants of the phone.
- Make sure you backup all your data in your phone before proceeding.
Complete Step-By-Step Instructions:
Step 1 – Download I8160XXLD8_ready_to_root_ANT.tar.zip for Galaxy Ace 2 to your computer and extract the zip file. Also download update_su.zip and save it to your computer.
Step 2 – Download ODIN which will help you to root Android 2.3.6 on Samsung Galaxy Galaxy Ace 2.
Step 3 – Switch OFF your phone. Now go to Download Mode. How? Press and hold the Volume Down + Home buttons together, and then press the Power button till you see “downloading” on your screen.
Step 4 – Make sure you have your Galaxy Ace 2 USB drivers installed on your computer.
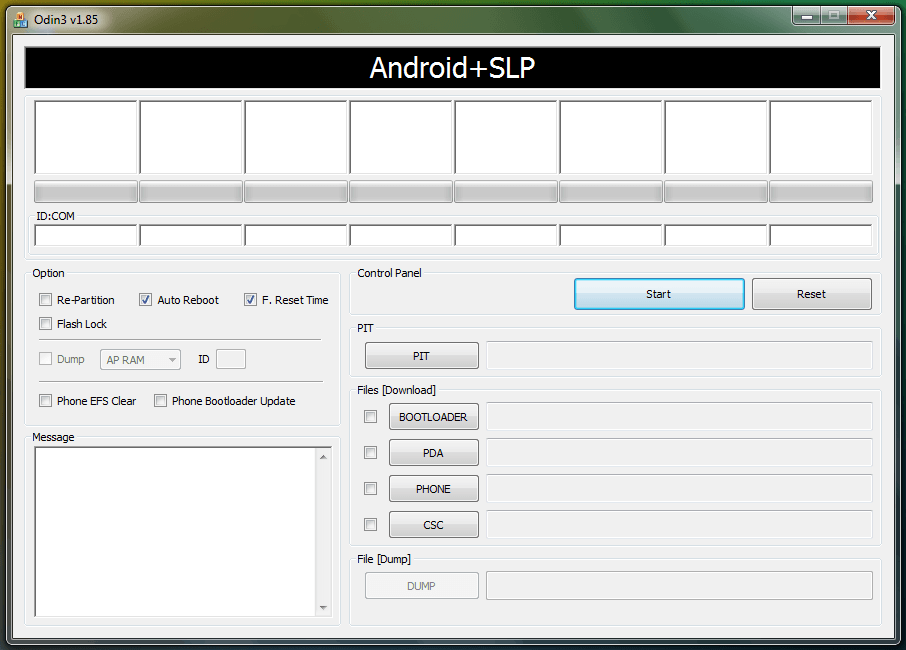
Step 5 – Open ODIN on your computer. Connect your phone to your computer while your phone is in the Download Mode.
Step 6 – If your phone is connected successfully, one of the ID:COM boxes will turn yellow with the COM port number. This step might take some time.
Step 7 – Now select the file that you have to flash/install on your phone. This file can be found from the extracted file in Step 1.
- Click on ‘PDA’ and select the file ‘I8160XXLD8_ready_to_root_ANT.tar’
Step 8 – In ODIN, check the Auto Reboot and F. Reset Time options.
Step 9 – Now click on the Start button in ODIN. Installation process will start and would take a few minutes to complete.
Step 10 – After the installation is completed, your phone will restart. After you see the home screen, keep your phone plugged in with the USB cable to your computer.
Step 3 – Now copy/paste the downloaded update_su.zip file to your SD card. Make sure the file is in the SD card root (not in any folder).
Step 4 – Then turn OFF your phone and disconnect from the USB cable.
Step 5 – Now to get in the Recovery Mode. Switch ON the phone while pressing and holding Volume Up + Home + Power buttons together. Alternatively, read this: How to Enter Recovery Mode on Any Android Phone.
Step 6 – In recovery, scroll down to “apply update from sd card” and press the Power button to select it.
Step 7 – Press the Power button again and select “choose zip from sdcard”.
Step 8 –Now using your volume keys, navigate to the update_su.zip file that you copied to your SD card and select it using the Power button. Confirm the installation on the next screen and the installation procedure should start now.
Step 9 – After the installation completes, go to “go back” and reboot the phone by selecting “reboot system now” from the recovery menu. The phone will boot now and it might take about 5 minutes to boot on your first time. So, please wait.
That’s it. Your Samsung Galaxy Ace 2 has now been rooted on Android 2.3.6 firmware. To make sure you have correctly installed the above root method and it’s working, verify with Root Checker as given in the link.
If you run into any problems, feel free to drop us a comment below and we will reply you back ASAP with the fix or the solution to your problem.


Hi,
I recently updated to official XXLK6 firmware, and wanted to re-root my phone, but I follow these steps again and when ODIN tries to open communication with the phone in download modem, it fails. I followed this steps with previous firmwares and worked correctly. Do you have a workaround for this?
Thanks!
i have sumsung GT-I8160P BGLK2 SPAIN MOVISTAR VEZRSION 2.3.6
GINGERBREAD.BGLK2 . WHO HAVE root fichier the same i8160 or it’s deffirent !!!! please i need help to root my sumsung
need help on how to re-root samsung galaxy ace2 gt-i8160 with android 4.1.2 official firmware!
I rooted my galaxy ace2 in its`s 2.3.6 and it worked well …. I upgraded it to 4.1.2 and it also worked great but it was reset and root was gone . when i tried to re-root it stuck on samsung logo and wont go any further ` so i bought a new one and upgraded it to 4.1.2 ` SOMEONE HELP ME ON HOW TO ROOT GALACY ACE2 WITH 4.1.2 official firmware!!!!!!!!!!!!!! PLSSSSSSSSSSSSSSS`
From Step 6 (In recovery, scroll down to “apply update from sd card” and press the Power button to select it.) my problems started. I wasn’t choosing “apply update from sd card” by pressing the power button, but by pressing the home button. Power off button wasn’t doing anything at all. I couldn’t find anything like “choose zip from sdcard”. i don’t know what to do.